Crucial MacBook Pro 4GB RAM Upgrade

This doesn’t apply to those of you lucky enough to already be rocking a brand new “brick” style MacBook Pro, but for those of us left in the dust there are other, most probably more sensible, upgrade paths available.
The compromises in the new MacBook Pro- need I mention the adaptor-hungry DisplayPort and the lack of a FireWire 400 port (instead opting for only 800) necessitating another adaptor – mean that it is not yet a viable upgrade for many old MacBook Pro owners. A new edition of OSX is on the horizon, too, which puts upgrades even further into the future for any MacBook Pro owner who doesn’t absolutely need the extra oomph. If we plumbed for the 2gb RAM option, shying away from Apple’s obscene prices, then there’s still a significant amount of performance that can be had by upgrading to 4gb.
And now you can do that for a measly £45! A hell of a lot less than the difference between your MacBook Pro and a shiny new one… particularly if you want to get a reasonable upgrade which will set you back nearly £2000.
Crucial was kind enough to send me a 4gb RAM kit so that I could run through the upgrade procedure and test the perceived performance gains for myself.
First and foremost, upgrading the RAM in a MacBook Pro (I’m using a year-and-a-bit old 2.2Ghz before multi-touch became prevalent), is a little bit more tricky than many other notebooks, including the plastic Macbook. But, unlike upgrading the hard disk, it’s possible for an end user to do it absolutely safely and in only a few minutes.
First you must remove the battery. This not only grants access to the screws that secure the RAM compartment cover but also serves to ensure that your MacBook Pro is fully and absolutely powered off before you attempt pulling and replacing your ram.
Grab yourself a suitable cross-head screwdriver. I had some difficulty finding the correct size, the screws are quite tiny and the wrong screwdriver can easily damage the heads and make them nigh on impossible to remove.

The next step is to unscrew the cover of the RAM compartment, revealing your old 2GB of RAM. Avoid contact with MacBook owners at this stage, they’ll be wanting to pilfer that 2GB of goodness to upgrade their measly 1GB.
Carefully remove the existing RAM by moving the clips apart and lifting it gently upward. The RAM should slide out easily and no force should be needed at this stage.
![]()
Revel in the sight of your empty RAM slots.
You’ll want to free your brand new RAM from its anti-static packaging using a pair of scissors and use the now empty bags to store your old RAM.
Here’s where it gets a little bit tricky.
I’m no stranger to RAM installation, I have refurbished PDAs from spares and disassembled then reassembled laptops for giggles. However, I was still immediately caught out by the amount of pressure actually needed to properly seat the new RAM into the MacBook Pro.
After what I thought was a firm and correct installation, the little clips “clicking” securely into place, I replaced the RAM cover, battery and attempted to boot my computer. No dice! I was greeted by a totally unresponsive MacBook Pro!
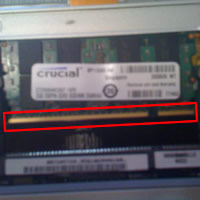
The picture to the right will show you more or less what you should see if the RAM has clicked into place but not correctly seated. The contacts along the business end of the RAM will still be slightly visible.
Don’t get caught out by this! The RAM will take a concerning amount of pressure to seat correctly and Apple technicians, particularly in MacBooks, have encountered the same problem and resorted to using non-conductive white grease in RAM slots to ease installation which many users mistook for thermal paste.
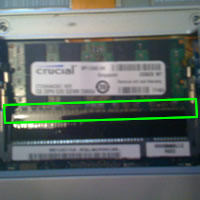
The picture on the left will show you what correctly seated RAM should look like. Apply pressure evenly and with increasing force until it pops into place and none of the contacts are visible.
Suffice to say, if you or a friend has a 1gb MacBook handy you will almost certainly want to use your otherwise useless spare RAM sticks to upgrade it to 2gb and turn the resulting 512mb sticks into key-rings. Be wary that you might find the aforementioned lubrication covering your RAM sticks and slots (In a MacBook only, I believe), but it’s harmless and there for a reason, so don’t attempt to clean it off.
With the RAM correctly in place, all you have to do is hold down the RAM compartment cover and screw it securely in position. Clip the battery back into your MacBook Pro, flip it over and power on your now slightly faster computer.
The performance difference between 2gb and 4gb is quite astounding. The first thing you will notice when running with 4gb RAM and checking Activity Monitor is that your basic running applications will have inflated to use more than the 2gb you previously had installed. Their RAM requirements haven’t suddenly increased, no siree, they are now running entirely in RAM rather than swapping out portions of data to your hard drive and will run faster and more responsively as a result.
This speed is best felt if you run Parallels, for which you should use a bare minimum of 2gb RAM, with 4gb your guest operating system will be more responsive and it’s far less likely to starve your native applications of RAM and cause them to start paging to disk. I run Windows XP and assign it a paltry 512mb RAM, but I am still able to lightly use Visual Studio 2008. My primary use for Windows XP is to Remote Desktop into work and 4gb of RAM allows me to do this whilst leaving my compliment of home applications running untouched. This normally means that, at a bare minimum, Adium, iTunes, Reason 4, Dreamweaver, Fireworks, Transmit and Safari are running too.
The extra RAM is also a boon to gamers, letting you achieve reliable game performance without having to first laboriously close the clutter of applications you may keep running for quick access.
Overall I maintain that if you’re confident enough to attempt the fairly trivial task of installing RAM then there’s no better way to be assured that it’ll work in your computer than grabbing it at Crucial. Furthermore, if you’re rocking a MacBook Pro loaded with 2GB RAM and want to delay purchasing a newer model for as long as possible, a RAM upgrade is one of the easiest ways to do so.